Using Feature Flags in a Preact Application
Sending your code out into the world can be a nerve-wracking experience. Regardless of how much testing you do beforehand, you’re never quite sure if everything will work according to plan. Even if it’s the case, during an applications life-time, you’ll need to redeploy your code many times. Code redeployment means time, money and a lot of hassle.
Fortunately, feature flags are useful tools that can help reduce the need for code redeployment as well as enable you to test your changes in production without affecting the end-user. In this article, I’ll show you how to make use of feature toggles in a React-like framework. So…

What are feature flags?
Feature flags, also known as feature toggles or switches, are mechanisms that allow the developer to enable or disable a feature remotely, without having to implement a code change. Specifically, by wrapping your feature in a conditional statement that is based on the flag, you get to turn it on or off from outside the development environment.
Basically, they are almost like boolean variables that you can control without changing code. Besides turning features on and off, feature flags are great for user segmentation, targeting, A/B testing or testing in a live environment.
What is Preact?
I’m sure you’ve heard of React always as it is quickly becoming one of the most popular frameworks for frontend development. Well, Preact aims to be a lightweight alternative to React, as it prides itself on having only 3 kB. Being so small, the JavaScript library is great for embedding, it’s portable, scalable, easy to integrate and easy to switch to from React. Just like it’s “big brother”, Preact uses a virtual DOM and prides itself on having a modern API and EcmaScript support.

It’s worth nothing that some big companies (e.g. Uber) have chosen to make the switch to Preact, as it is superfast and great if you’re worried about your app’s performance. Besides, it is considered easy to learn if you’ve handled JavaScript or React before and doesn’t need fancy tools in order to run. The best way for me to show you how Preact works is through a clear example.
The Sample App
In our culinary blog app, we’d like to have a feature where we can suggest meals to our readers. All the user has to do is click a button and the app will automatically select a soup, a main course and a dessert. However, I might have users that would like to opt out of seeing deserts as they are watching their sugar intake at the moment. Maybe in the future we’ll want to include vegan-only options.

In this tutorial, I’ll show you how you can disable a feature for some users by targeting them with the use of feature flags. To manage my flag, I’m using ConfigCat’s feature flag management system.
Consult the completed app here.
Create a ConfigCat account and feature flag
Before we start coding, we need to prepare our feature flag management system. In order to do that, head over to ConfigCat and create a free account. Then, log in and head to your dashboard. This is the place where you can manage all your feature flags.
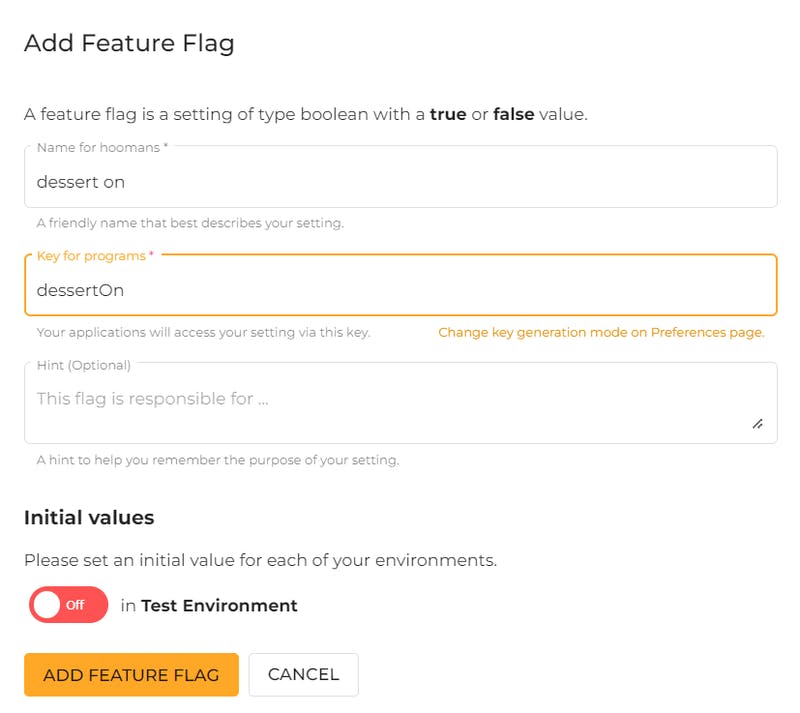
For now, we're going to create a simple flag called dessertOn like in the picture below.

Create the app and add the SDK
Now, we need to create the Preact app. The easiest way to do so is by using the Preact CLI. There are other ways of creating your app which require a bit more knowledge and which you can check out here. So, using the following command, I can initialize a new Preact project using the simple template.
npx preact-cli create simple culinary-site
Next, it’s time to add the corresponding ConfigCat SDK. Since Preact is a JavaScript library, I’m using the JavaScript SDK, which I’m adding with the following terminal command:
cd culinary-site
npm i configcat-js
In order to start the development server, you need to execute the following command in the project folder:
npm run dev
You'll notice that the app doesn't automatically start, so you need to manually open a new browser page with the address localhost:8080.
The SDK we previously added needs to be imported in your code, so head over to index.js and add the import statement.
import * as configcat from "configcat-js";
Now that the app is created and the SDK imported, it’s time to start coding. First, we’ll add some dummy data to represent our foods and a method that randomly selects a dish from each category.
import {useState} from 'react'
...

export default function App() {

    const soupOptions = [ "tomato soup", "mushroom soup", "chicken soup", "ramen", "potato soup"]
    const mainsOptions = ["chicken salad", "wrap", "sandwich", "roasted potatoes", "salad"]
    const dessertOptions = ["cupcake", "blueberry pie", "poached pear with vanilla sauce", "apple pie", "icecream"]

    const [chosenDessert,setChosenDessert] = useState('');
    const [chosenMain,setChosenMain] = useState('');
    const [chosenSoup,setChosenSoup] = useState('');

    const chooseMenu = () => {
        setChosenSoup(soupOptions[Math.floor(Math.random()*soupOptions.length)]);
        setChosenMain(mainsOptions[Math.floor(Math.random()*mainsOptions.length)]);
        setChosenDessert(dessertOptions[Math.floor(Math.random()*dessertOptions.length)]);
        }
}
Then, we need to create the ConfigCat client by pasting the code below.
const [flagValue, setFlagValue] = useState();

let configCatClient = configcat.createClient("YOUR-SDK-KEY");

configCatClient.getValueAsync("dessertOn", false, userObject).then((value) => {
  setFlagValue(value);
});
You’ll notice you need to add an SDK key. In order to find yours, head back to the ConfigCat dashboard and look for it in the upper right corner.

It's time to get into the exciting stuff. Since we want to segment our users based on some criteria, we'll need to create a user object to identify each user by an ID and to have the selection criteria. We're going to assume our users have logged in to our app and have a subscription type, which can be sugarFree or normal. Those with a sugar-free subscription will not be given a dessert option.
Paste the code below which creates a user object with a dummy ID.
var userObject = {
  identifier: "1234", // Unique identifier
  custom: {
    SubscriptionType: "sugarFree",
  },
};
As you can see, in the custom section, I’ve added the subscriptionType and gave it the “sugarFree” value.
Now, let’s actually use the flag. We’re going to use a ternary operator, which is often used in React and is also present in Preact to choose whether the dessert is displayed or not. Alternatively, you could use the flag inside the chooseMenu function so that a dessert is not even selected for sugar-free users.
return (
  <div>
    <button onClick={chooseMenu}>What will I eat today?</button>

    <div>Soup: {chosenSoup}</div>
    <div>Main: {chosenMain}</div>
    {flagValue ? <div>Dessert: {chosenDessert}</div> : null}
  </div>
);
Setting the flag value
Now, we need to give the flag a rule. Head to the dashboard and set the targeting rule like in the picture below. First, select Target Specific Users. Then, from the dropdown, select Custom, input the criteria rule (in our case SubscriptionType) and choose the IS ONE OF(cleartext) comparator, and input the value "sugarFree". Then, turn the flag off for this category of users and on for all the others, and you're done.
Now, for all users with sugarFree SubscriptionType the feature flag will be automatically turned off, while all other users will have an on flag.

If you go to the development server, you should not see a dessert.

If you head back to your code and change subscriptionType to normal, save and reload the app, the dessert option will now be presented.

Pretty cool, right? This example simulates what happens in real life, where you have multiple users with different IDs and different subscriptionTypes.
Key Takeaways
In this tutorial, I’ve shown you how to do a simple user segmentation for a feature using feature flags in a cool, flexible JavaScript library - Preact. Let’s recap what we’ve walked through so far:
Create a ConfigCat account and log in
Create a feature flag
Create a Preact app using Preact CLI and import the JavaScript SDK
Add the necessary dummy code
Create the ConfigCat client, add your personal SDK key and create a dummy user
Add a flag rule to your flag in the dashboard
Change the custom criteria to see the changes
As intimidating as user segmentation can be at the beginning, I hope this tutorial has given you some insight into the process and shown you how simple it can be when using a feature flag management system like the one provided by ConfigCat.
Since there’s much more you can do with feature flags, be sure to keep up to date with more information by checking out the blog and following ConfigCat on Facebook, Twitter, LinkedIn and GitHub.