Got some free time on your hands? Got you covered!
I'm going to show you a more peculiar way of using feature flags. Feature flags enable non-developers to switch on and off application features or change software configuration.
Following this step-by-step tutorial, you'll build a remote light switch using a Raspberry Pi and ConfigCat’s feature flag tools in no time. Let’s get started!

What you’ll need:
- A Raspberry Pi 2, 3 or 4
- A ConfigCat subscription (ConfigCat is a cloud-based service that lets you release features without code deployments)
- Python 3
- The ConfigCat Python SDK
- (Optional) GPIO Zero integration
Step 1 – Prepare the device to run your code
There are a few things we need to do before we dive in.
You’ll need to set up your Raspberry Pi. I use Raspbian OS on mine, which I prefer as it contains all the necessary components for my projects. However, you can use any distribution you prefer. You can read more about Raspberry Pi OS installation here.
Once your board is set up, you’ll need to install the ConfigCat Python SDK with PIP:
sudo pip3 install configcat-client
Next, you can also install the gpiozero libraries. The Raspbian desktop image already contains the GPIO Zero package by default. If you’re using a different OS, you’ll need to use PIP:
sudo pip3 install gpiozero
Step 2 – Set up your ConfigCat Project
In order to access and manage a feature flag, I'm using ConfigCat's service.
To do that, you’ll need to go to ConfigCat, create an account and login, then head over to your own personal dashboard. Next, create a feature flag called demoswitch. Take a minute to locate your SDK key in the upper right side of the page, as you're going to need it soon.

Step 3 – Code
Time to code! Start by creating a file (e.g. remoteswitch.py) with your favourite editor, and add the following code:
from gpiozero import OutputDevice

import time

import configcatclient

# set GPIO#3 port (you can select any GPIO output port)

relay = OutputDevice(3)

# initialize ConfigCat client to get your setting value

client = configcatclient.create_client_with_manual_poll('YOUR_SDK_KEY')

while True:

# get the latest value

client.force_refresh()

# save into 'my_remoteswitch' variable

my_remoteswitch = client.get_value('demoswitch', False)

# for debug purpose only

print(my_remoteswitch)

# depend on the value the condition turns on/off the output

if my_remoteswitch == True:

relay.on()

else:

relay.off()

time.sleep(5)

pause()
Add your own SDK key on line 9. This solution uses the ConfigCat SDK’s in manual polling mode. You can read more about polling modes here.
Step 4 – Test
To test that your flag is working correctly, simply run your code with the following:
python3 remoteswitch.py

Depending on the setting’s value, the program will print the actual value of your switch on the ConfigCat Dashboard and will turn the Output Device on or off too.
Step 5 – Demo
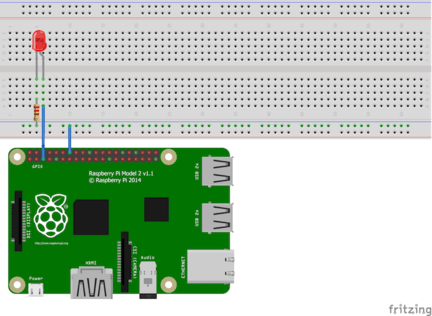
Time to demo! To integrate the LED, I created a simple circuit using the following components:
- A LED diode to show the switch status
- One resistor to limit the current (500 Ω)
- Two wires to connect the GPIO#3 port and a ground
- Raspberry Pi to serve power to the LED (no external power supply required)
Here’s what it looks like:

And that’s it! For further development possibilities, you could set up as program as a daemon (always run after reboot), or you could apply this solution with any wireless power switch on your home.
Feature flags are robust mechanisms that can be used for a variety of different things, from feature management, to A/B testing, canary releases or more. In this post, we've covered a more unusual method of using feature flags to show you once again how many use cases can be covered by a simple flag with ConfigCat's feature flag system.
Want to learn more about the power of feature flags? Connect with ConfigCat on Facebook, Twitter, Linkedin and Github.
